Design Tool

Our Design Tool is one of the easiest web to print design tools you'll find in the industry. We provide features that our competitors don't offer. We provide videos and other information to help guide you through a successfully designed print.
If you do get stumped or need assistance, don't worry because we're here to help assist you with your questions. Just give us a call and we'll walk through your questions with you. Success is yours if you follow the information below.
We're constantly working to improve our Design Tool, if you have feedback or would like to make a suggestion, please email us and we'll take it into consideration.

Design Tool Introduction:

This is the view you can expect to receive when entering the Design Tool for most of our products.
- Product that you're currently designing
- Product details allows you to make changes to the product including changing the product for your design. Things like Size, Color, Borders and non-printed editing tools to help assist you in your design.
- Add New Text button will pull up a window for you to enter the text you want to add to the design tool. From here you can also select from over 800+ fonts, change the text color and add textual effects.
- Add or Upload your own images through this option. If you don't have you own image this feature will also provide you with access to over 1,000,000+ images. You can even edit the colors of some of our images, just not our photographs.
- The Undo/Redo option will allow you to take a step back or and update your most recent change. Not pictured here are other design tool editing options that will be covered in the next section "Design Tool Introduction #2". You'll see options only available to you once something has been added and is selected into the design window.
- The ruler will help you confirm the size of your product and will help in the process of your design layout. If you use the zoom function (see below arrow #5) the ruler will also update accordingly.
- This area is your product and is ready for your design elements like text and images to be added. The checkered area outside of this area will NOT print. It is important to keep all important design elements inside the design within 0.125". You can turn on the Safety Line to confirm where this is for your product and your product size.
- When designing a product that has multiple sides you will be provided with this option to change which side you're currently working on. When changing sides, you will be asked if you'd like to duplicate or copy your design to the new side you're moving to.
- The right side of the Design Tool contains Design Details, Call to actions and Secondary actions that some people might prefer to use instead of adding their design to their shopping cart. The Design Details helps confirm the settings you've made.
- When you're finished with your design and would like to place your order, you can use this button. Above the Add to Cart button you'll see a breakdown of pricing and the current quantity entered.
- If you're not ready to place your order, not sure of the size you need or what to share your design with others before you place your order then consider one of these options. The Save option will allow you to save your design so you can come back to it later. The load option is when you're ready to load your design once you come back to it at a later time. The print option allows you to print your design from your desktop printer so you can cut it out and tape it onto your intended application surface. Just keep in mind that the color of your print on your desktop printer will likely vary considerably from what we will actually print. It is also important to note that printing a test print for a design under 8"x8" should be printed at 100% for accurate test. NOTE: always measure your print to make sure it printed accurately.
Design Tool Introduction #2:

Once you add a design element to your product you can then start to edit your layout. Simply clicking the item in the Design Window will give you new options that you didn't have before. All of these new options are provided based on the item you currently have selected in the Design Window.
- The first thing you'll notice that is new is the Edit button on the side panel. If you have an image selected it will say "Edit Image" but if you have a text element, it will read "Edit Text".
- New options on the side will also be available for anything you have selected in the Design Window. If you don't see these options, you likely need to first make a selection. These options allow you to duplicate the item you have selected, align the design according to the product, arrange a design element to be in front of or behind another design element, or flip the design element so it faces a different direction.
- Once you have more than one design element in your Design Window it might start to get difficult to see which item you have selected. The selection box surrounds the design element you currently have selected. If you meant to select something else, simply click that other item. It might be possible that you can access it, if it's behind another design element. Just play around with your layers so you can access it and then rearrange the layers again once you have everything where you need it.
- The size of the item you have selected is displayed in a small label above your selection box. Changing the size of your design element will automatically update the size listed in this information box. If you deselect your design element, the box will go away.
- Each selected design element comes with some extra tools in the corners of the selection box. This option looks like a trash can and will remove the item from your design window if you click it.
- If you need to quickly resize your design element you can do it in the through this quick tool. The icon looks like a double sided arrow. When clicked and held you can pull or push the design to shrink or enlarge the design. If you exceed the suggested print size you'll receive a warning on the left side of the Design Window (not pictured).
- On occasion, you might need to rotate your design element a little. Use this tool to make quick rotations to the selected design element.
Sizing Design Elements:

By default when you upload your own images or add your own text, the maintain proportions check-box is checked to help ensure that when you change the size of your design elements the size remains proportional. If you want to change the size of a graphic but do not want to maintain proportions you will want to unlock the aspect ratio.
Click the lock icon under the Add/Edit Text or Add/Edit Images to unlock the aspect ratio. The width and height aspect ratios will then be unlinked so that when you enlarge the width or height the opposing dimension will not change. In some cases you will want to skew or stretch out your design element a little. We encourage you to not enlarge or stretch out uploaded images too much. Pixilation may become an issue. If you do increase the size of your design element too much you will receive an image resolution warning.
Arrange Layers:

When multiple design elements are present you may find the need to control which design element shows up on top or on bottom. We call this layering and you’ll find it similar making a sandwich. If you put one item on top it will cover up what is underneath it. The Arrange Layers option is not visible until you add more than one design item to your design window. It can be a picture, text or other graphic. With two items in the Design Window you can now layer them as needed.
To layer your design elements first select the item you want to send backwards or bring to forwards. With one of the items selected you should now have access to the Arrange Layer options. You can find this option to the lower left of the Design Window. The following image will show an example of the Arrange Layer options. The Arrange Layers in the Design Tool only provides you with two options, "Send to Front" and "Send to Back".
Sometimes you will find yourself stuck because you can not select a smaller item buried underneath larger design elements. To work around this issue instead of attempting to bring the smaller element forward – send the larger element to the back. You may need to do the same to a few design elements to get the intended layering effect.
Removal of Design Elements

From time to time you may need to delete an item or clear your design and start over. It is important to first identify the difference between Deleting an Item and Clearing your Design. You can see in the image provided that we have highlighted two options. The Clear Design option (arrow #1) will clear your entire design so only select this option if you want to start your design over from scratch. This option is only available when you have at least one design element inside of the design window.
To delete a single item from your design you can use the Delete button found inside of the design window as provided in the picture through arrow #2. You will however need to first have the item you want removed selected.
Letter Spacing & Line Spacing

Letter spacing (aka Tracking) can help save space and clean up text in turn making things easier to read. Unfortunately this is currently only a feature in some browsers. At the time of this writing, (5-25-2017) Firefox is the only browser that does not support this feature. We suggest using an updated version of Chrome or Safri to setup your design. See arrow #1 in the Vinyl Lettering Tool image for an example of Letter Space settings.
Line spacing, also known as leading, is also a feature that is not available in Firefox. With line spacing you can increase or decrease the amount of spacing between multiple lines of text. It should be noted that the Line Spacing feature will not be an available option until you include more than one line of text. See arrow #2 in the Vinyl Lettering Tool image for an example of the Line Space settings.
Uploading Images

There are a couple of things to note when uploading a file through our Design Tools. Our system does two things.
- Your original uploaded image is saved in a secure location so that we can access it for production purposes if you place an order.
- A lower resolution image is created by our system to be used in our Design Tool for faster editing.
We prefer images to be uploaded in a vector based format or at least a high resolution raster based image. Our Artwork Guidelines will cover these details in more detail if needed. If you do upload a raster based image, like a .jpg, .png or gif, image you should know that our system will calculate your maximum printable size for your image. If your image is setup too large in the design tool we will provide an Image Warning to help protect you from poor print quality. You can avoid this by reducing the physical size of your image inside of the Design Tool before placing your order. If you do not then you order may likely be placed on hold until we can obtain better artwork from you.
If you're a professional designer and use Adobe Illustrator or other graphics programs to setup your images we suggest that you first fit your artwork to the document size. Doing this will remove any extra white space around your artwork and will help make resizing your graphics in our Design Tool a little easier. In Adobe Illustrator this option can be found under Objects/Artboards/Fit to Artwork Bounds.
Zoom Tool

Sometimes users need to fine tune the placement of their design elements. This is when the zoom tool can come in handy. This is one tool that should always be accessible to you, if needed. Some tools that do not allow you to edit exact positioning or add multiple layers like the Vinyl Lettering Tool will not include the zoom functionality.
You can find the zoom tool in the bottom left corner of the Design Tool. This slider based setting will allow you to zoom into your design. You can pan around the design by clicking and dragging on anything other than a design element. If you have a design element that fills your entire design window when zoomed in you will not currently be able to pan around your design window. We are working on fixing this issue.
It should be noted that the 100% zoom level does NOT depict actual size of your product. It is simply an arbitrary zoom level percentage. We are also working on getting the zoom level to depict actual size of your item, even if the item cannot all fit inside of the design window.
Change Product Settings

Product settings will let you change any of the following:
- Product Size
- Product Color
- Product Orientation via Flip and Rotate
- Product
You can simply change the product directly within the design tool without having to navigate back out to the correct product page if you want to. We do however highly suggest that you read about a new product prior to switching over to the new product. Doing this will help ensure that you know exactly what you should expect to receive. Within the Design Tool you can also setup custom sizes for the product based on your desired size if our default sizes will not work for your needs. We are constantly adding new colors to our line up so if you do not see a product color that you would like, please make the request and we will see what we can do to add it.
If the orientation of the product does not work for your needs you can flip it and rotate it to get exactly what you need. It should be noted that not all products contain the flip and rotate option. These options are only available for products that feature a non-symmetrical shape. In our example we're showing the Howling Wolf Decal to display these options for your review.
Copy Text Settings

If you’ve spent a good amount of time customizing your text options but need another text box or line of text with the same settings use the copy feature to help save some time. When changing the text the letter size will change. Hopefully the amount of characters used in the new text box is the same; otherwise you’ll have some manual adjustments to make to ensure same letter size. This copy feature works on uploaded images and clip art graphics too.
Size Tool
Getting two design elements the same size can be tricky. The best way make the graphics and text sizes the same is to use the size feature. Select one element in the design window and then click size. You may want to click the maintain proportions box before making any changes. Take note of the height difference between the two items. When you know what size you’re looking for select the other item and make the necessary changes. If one design element has textual descenders (lower case y, g, j, or any other character that goes below the base line) and the other text box does not then this work around may not work for you.
Sizing Lettering

If you're attempting to size two lines of text to be the same size but one line of text has a descender and the other does not then you’ll want to do the following: Find two similar letters in both text boxes (like the letter a or b) move one text box above the other until the letters are almost aligned together. Change the color of one text box so that you can see where the top letter starts and the bottom letter stops. You can then change the top text width and height until both letters are exactly the same size. You may need to reposition the top text box a little until you cannot see the bottom letter. Move the text box back into place and change to color back to the color you want and you’re good to go.
Sizing Design Elements

Sometimes it is difficult to know just how large or small clip art objects, parts of uploaded files, individual letters or other design elements are in the design tool. To find out click the Add Text button and enter a period then click ok. This will give you a large black square in your design window. You can then re-size the square (aka period) to the same size as the element you want to measure. Once re-sized select the size tool to learn the width and height dimensions.
Bold Text

Some fonts do not have a bold option but that does not mean you still can’t get a bold look. If clicking the bold option under the message window does nothing for your font of choice then you can always work around this by adding a stroke/border in the same color to thicken up your text. Borders can be found under the effects tab. Adding a faux border this will works just as well as the real thing.
Curved Text
Customers will often want text to conform to the shape of their selected product; for instance a circle decal or car magnet. This can be done through effects. This process can be tricky but with a little effort anyone can get their text to curve as needed. There are a couple of options that will make this possible. Arch Up and Can Up are two possible options that will provide the intended results.

Many times however the text may not follow the same just right. You may need to manipulate the width and height of the text box a little to force the curvature of the text to conform to the product shape. This will not work for complex shapes like butterflies, stars, or four-leaf clovers. You may need to adjust letter spacing, text height and width, and amount of effect applied.
Application Surface Consideration
Consider the application surface. Decals with dark backgrounds do not show up very well on modern car windows due to factory window tinting. We suggest choosing a brighter colored background for best results. If your surface is already bright consider starting with a decal with a dark background. For vinyl lettering you can always outline or add a border in a bright color if darker colors are needed. The bright border will then help highlight the text and make it pop off the surface.
Sketch it Out
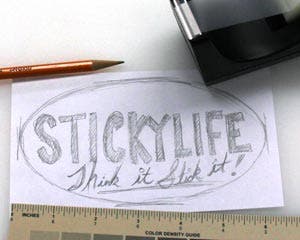
It never hurts to sketch it out. Take your time by starting out with something we like to call a “Brain Dump”. This process allows you to put all the design pieces "on the table" and dissect what is truly needed and in what order (hierarchy). Very similar to putting a puzzle together. Nobody really starts in the middle.
You can also tape up your rough sketch to the surface you plan on applying your product to. If it is a vinyl decal and you intend on applying it to a car window then doing this will give you an idea of how large or small you want your decal to be. It is always a good idea to start with a sketch before starting the online design process.
Save Your Work
Save your work periodically to have access to different design phases. This will give you a historical presentation on your design phases. You can then access your past designs if needed. Bookmarking your favorite designs is also a good idea for fast and easy access. It will also allow you to organize or categorize your designs based on your needs.
Choosing a Font

Plan to spend some extra time reviewing all font options. Carefully choose your font. A good font selection is important based on your message. If you’re a lawyer and want people to take your seriously then comic sans is not a good font selection. In fact comic sans is never a good option; unless you’re a comedian or your ultimate goal is to make people laugh. Getting the tone and emotional feeling right is really important.
Line Spacing

Play with textual layouts. You can add multiple text boxes and position the text in different ways to give yourself something special. Sometimes you’ll want a bold line of text on top and smaller text underneath. That isn’t possible within one text box but you can make that happen with multiple text boxes. You will also be able to control line spacing (aka Leading).
Experiment
Experiment and have fun. The design process is a fun and entertaining process and shouldn’t feel overwhelming or difficult. When you take each step at a time you’re sure to end with something amazing.
Limit Font Variety

Don't use more than 2 fonts. The more fonts you use the busier your design becomes. Limit yourself upfront to two font selections to help make it easier. There have been expensive studies done that have proven that when multiple fonts are used readers develop eye strain and find it difficult to pay attention to the message.
Multiple fonts combined together can be a really nice affect but caution should be used. Two different fonts can be paired together quite nicely, however the more you add the more cluttered the design becomes. The following image is a good example of what not to do.
Test Your Design Before Ordering
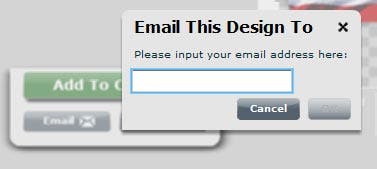
Test your design out with your friends, family, and colleagues. You may find inspiration from the least likely of places or may learn something needs fixed from an unlikely source. When spending so much time on your design you may be over looking something obvious that others may find right away. Fresh eyes never hurt anybody. Consider sharing your results through our design tool's email feature or sending the saved design link to others through email.
A Graphic Designer May be Needed
Our design tools are not difficult to use but will only get you so far. It is possible that you’ll need to use a graphics program like Adobe Photoshop or Adobe Illustrator to create what you’re looking for. Those programs can be difficult to learn and you may need to hire a graphic designer.
In most cases we hope that you will be able to create something similar to what you’re looking for by combining our design tool features like Add Text, Upload Images, and Search Clip Art options through our design tools. If all else fails you can always search through our design templates to find something similar and then change the design to your liking.
Check out these tutorial videos on our Design Tool
In this tutorial video, we show you how to upload your own image into our proprietary Design Tool on our website, whether it's a raster image or a vector PDF.
This tutorial video covers how to use the Design Tool to add text to your design, including choosing a font, adding a text effect, and more.